We recently adopted a new puppy to our home. One thing we quickly realized is the dog is too small to jump up and down off the bed. We needed something to help the dog get to the top of the 26" high bed. There were no dog stairs packages that went high enough. We purchased a ramp from PetsMart for $130 that made stuck out 5 feet off the bed that the puppy used no problem. However, it was very much in the way of walking around the bed and extremely pricey. I vowed 'I could build a ramp for this that could run along the side of the bed and cost a quarter the price.'
I succeeded in building my own ramp for the dog. It cost a total of $22 (not including power tools).
Materials used:
A power screwdriver (or, a screwdriver if you want to do it the hard way)
A power circular saw (or, a hand saw if you want to do it the hard way)
A tape measure
Two eight foot 2x4 pieces of wood (2.64 each at Lowe's)
One ten foot 1x10 pieces of wood (9.72 at Lowe's)
20 or so screws ($3 at Lowe's)
10' roll of silverware drawer liner, 24" wide. ($4 at Wal-Mart)
Begin by cutting four 2x4 post the height of your bed. In my case 26".
Second, measure the length of ramp you will need. This will vary depending on the bed and dog. In my case I cut 7'. So, I cut the 1x10 at the 7 foot mark.
Next I cut 1 foot of the 1x10 for the bottom base. And lastly I cut about 18" of the remaining 1x10 for the top platform. 18" so there is a 6" overlap to bridge the gap between the top of the ramp and the bed. We do not need the small dog or puppy having to jump over a 4" gap to get to the bed.
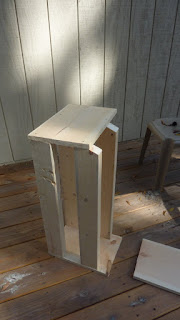
Using the 12" of 1x10 base, screw in the four 2x4s to bottom of ramp base as legs. You will want to space them 5" apart. Screw them in with 1 screw each pillar for now.
Make sure the distance between pillars is the same on both sides of the base. Write down these measurements as they must be equal on the top part of the base.
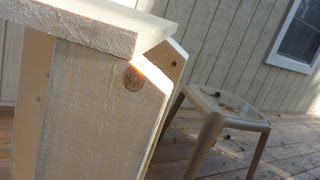
At the top leave 1 inch of the top of the 2x4 uncovered. This should come naturally if you measured exactly 5" between the stands legs.
Measure angle to cut by placing wood for ramp at the distance and angle you plan and mark the angle. Once you mark the 2x4 with the angle, cut off as shown in the above pictures. This is what the ramp will be screwed into.
Before screwing the ramp to the base you will want to attach the drawer liner to the ramp and base top. This is what will allow your dog to have traction and grip to walk up and down. Without a gripping surface your dog will slip and quickly be turned off by the idea of using the ramp. I used industrial adhesive glue, you can use another type of glue or nails or screws or whatever. After covering the top and the ramp with the gripping surface you can screw in the top of the ramp to the base.
If my instructions seemed unclear or confusing hopefully the many pictures will help fill in the gaps. I did this will little planning and can easily be adjusted to fit your bed or couches specifications. However, in the end it cost around $23. It takes up less walking room than the store bought ramps and is easier to use than stairs and again, cheaper.


thank you for this .... i am building one for my dog right now.... great instructions. cheers!
ReplyDeleteAWESOME! thank you SO much for this info/going to make this tonight
ReplyDeleteThank you so much! This is exactly what I needed! Outrageously priced ramps or overly complicated plans are all I seem to find until your post! :) AND you included ALL the materials, which is great because it seems like other how to posts always assume we're working in Bob Vila's workshop.
ReplyDeleteI googled for hours trying to find the right DIY dog ramp for our aging dog with bad hips & a back before determining your design was the way to go. Your instructions were simple to follow & perfectly met our needs. I am so grateful you made this post & I was able to find it. If anyone is interested, there is a link to some pics of the ramp we made following your exact instructions on the wood construction at the bottom of this comment. We did cover ours in a lacquer paint & carpeting, as well as building it 30" high for our bed. We've had it for 2 days now, our old dog is still a bit unsure about using it but slowly she's warming up & we're patiently being consistent with encouraging her to use it. Thank you thank you thank you for this post, not only did it get us a dog ramp made, but it gave me some peace of mind that we're doing all we can to make sure our dog is in the least about of pain! http://imgur.com/a/yzCdK
ReplyDeleteThanks for your instructions! I have a question is this made for a king size bed?
ReplyDeletenice post
ReplyDeleteI guess it's up to the dog owners to see to it that their pooches get the exercise they badly need. It doesn't matter if you have a dog for lazy people or dog for active people. Once the owner made it a habit to exercise his pooch, results will follow. My sister has a bulldog and that dog can be extremely lazy if left on his own. Good thing my sister is such an active walker and now, Doug, her dog is getting a lot of physical activities, too. For more information on dogs for lazy people, see this wonderful site: http://dogsaholic.com/breeds/info/dogs-for-lazy-people.html
ReplyDeleteWhat does this have to do with the dog ramp? Cheers.
DeleteIt was really insightful.
ReplyDeleteThanks for such a nice content.
Cheers
BTW if anyone interested more have a look petcareio.com thanks
Thanks for such a nice content. Apppreciate it :)
ReplyDeleteCheers
If anyone interested similar one's have a look here . thanks
Thank you so much for such an informative piece of information :)
ReplyDeleteIf anyone interested similar one's have a look here
petcareio
Thanks
I live fulltime in an rv and have VERY LIMITED space for a ramp, one of my girls, a chiweenie, seems lately to have trouble getting off the bed, and I can’t find a ready made ramp that’s narrow enough, but I really need it to be “foldable” so I can get out of the bed 🤪. I was thinking of putting “piano ?” hinges at the platform/top of the legs and splitting the ramp about evenly and putting another “piano hinge” so I could fold it up and out of the way, then I’d need to secure it so it didn’t fall down. Do you think this would work ? ! ?
ReplyDelete